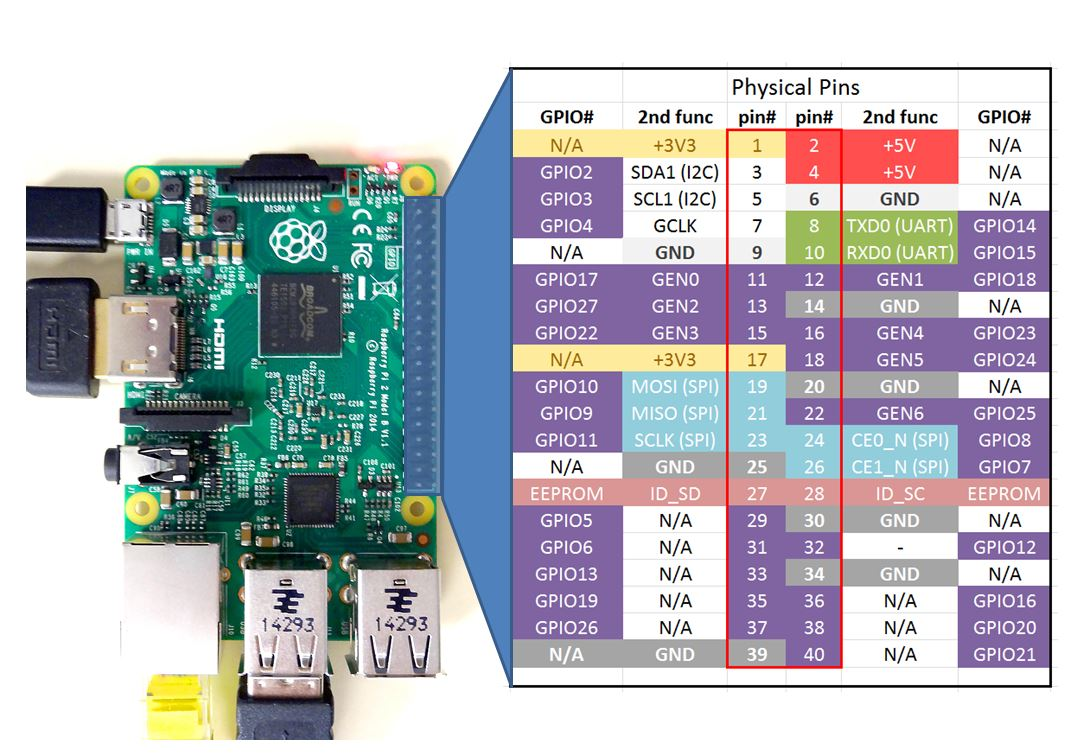
硬件

引脚图

20160807035602813

关机命令

正确关闭Raspberry Pi的最简单方法是使用一个非常简单的命令。你可以在下面找到这个命令。

1
sudo shutdown -h now

初始化工作

换源

打开文件编辑内容

1
sudo nano /etc/apt/sources.list   

我的是Debian 10 (buster)—3B(aarch64) 参考

1
2
3
4
5
6
7
8
9
10
# aarch64 用户:编辑 `/etc/apt/sources.list` 文件,用以下内容取代:
# 默认注释了源码镜像以提高 apt update 速度,如有需要可自行取消注释
deb https://mirrors.tuna.tsinghua.edu.cn/debian/ bullseye main contrib non-free
# deb-src https://mirrors.tuna.tsinghua.edu.cn/debian/ bullseye main contrib non-free
deb https://mirrors.tuna.tsinghua.edu.cn/debian/ bullseye-updates main contrib non-free
# deb-src https://mirrors.tuna.tsinghua.edu.cn/debian/ bullseye-updates main contrib non-free
deb https://mirrors.tuna.tsinghua.edu.cn/debian/ bullseye-backports main contrib non-free
# deb-src https://mirrors.tuna.tsinghua.edu.cn/debian/ bullseye-backports main contrib non-free
deb https://mirrors.tuna.tsinghua.edu.cn/debian-security bullseye-security main contrib non-free
# deb-src https://mirrors.tuna.tsinghua.edu.cn/debian-security bullseye-security main contrib non-free

按 ctrl-o 保存,按 ctrl-x 关闭。

参考链接:https://mirrors.tuna.tsinghua.edu.cn/help/raspbian/

公钥签名问题

     执行”sudo apt-get update”时出现问题:
          由于没有公钥,无法验证下列签名 :NO_PUBKEY 76F1A20FF987672F

     解决:
          sudo apt-key adv –keyserver hkp://keyserver.ubuntu.com:80 –recv 76F1A20FF987672F

查看C语言编译器

更换Python版本

查看当前默认python版本
安装好系统后,默认的python版本应该石2.7
通过命令行即可查看

1
python

正常情况下,显示为python2.7

在系统中,其实是python2,python3都安装了的。通过以下命令即可查看其位置

1
whereis python切换python版本

非常不建议卸载python2.7,我们只需要修改软链接即可,将默认设置为python3.7

先将python的链接删了

1
sudo ln -s /usr/bin/python3.7 /usr/bin/python

将python3软链接上去

1
sudo ln -s /usr/bin/python3.9 /usr/bin/python

注意这里写python3.7是根据你实际查询出来的版本,如果你是3.8就写3.8

再运行python即可看到默认是python3.7了

安装CMake 编译

CMake 是一个跨平台的安装(编译)工具,可以用简单的语句来描述所有平台的安装(编译过程)。他能够输出各种各样的 makefile 或者 project 文件,能测试编译器所支持的 C++ 特性,类似 UNIX 下的 automake。只是 CMake 的组态档取名为 CMakeLists.txt。Cmake 并不直接建构出最终的软件,而是产生标准的建构档(如 Unix 的 Makefile 或 Windows Visual C++ 的 projects/workspaces),然后再依一般的建构方式使用。

下面是如何在树莓派上安装 CMake 编译器的教程。

安装 CMake

在树莓派的终端,或者 SSH 登录之后,输入下面的命令:

1
2
sudo apt update
sudo apt install -y cmake

确认 CMake 的版本:

1
cmake --version

测试 CMake

创建一个新的目录,用来保存项目文件:

1
mkdir helloworld &&  cd helloworld

创建文件 main.c:

1
nano main.c

编辑文件,加入以下 C 代码:

1
2
3
4
5
6
#include <stdio.h>
int main()
{
printf ("Hello world\n");
return 0;
}

创建 CMake 配置文件 CMakeLists.txt:

1
nano CMakeLists.txt

添加下面的内容:

1
2
3
cmake_minimum_required(VERSION 3.0)
project(hello C)
add_executable(hello main.c)

建议创建单独的目录来保存 CMake 生成的文件。

1
mkdir build &&  cd build

项目的文件结构类似:

1
2
3
4
helloworld/
build/
CMakeLists.txt
main.c

在构建目录中运行 cmake 命令,使用位于父目录中的 CMakeLists.txt 文件生成构建文件。
默认情况下,CMake 将为原生构建系统生成构建文件。在我们的例子中是 makefile。

1
cmake ..

完成之后,使用 ls 命令查看目录会显示下面的文件:

1
CMakeCache.txt CMakeFiles cmake_install.cmake Makefile

我们看到 Makefile 文件已生成,现在就可以执行 make 命令了:

1
make

执行编译好的程序:

1
. /hello

卸载 CMake

如果需要完全卸载 CMake 以及依赖项,运行下面的命令即可:

1
sudo apt purge --autoremove -y cmake  gcc make

参考链接:https://shumeipai.nxez.com/2022/04/12/install-cmake-on-raspberry-pi.html

Git安装

1
sudo apt-get install git-core

GPIO库

C语言

安装 Wiringpi

1
2
3
4
5
6
7
wiringPi安装
//克隆库
git clone https://github.com/WiringPi/WiringPi.git
//进入文件夹
cd WiringPi
//编译安装
./build

查看版本

1
2
3
4
5
6
7
8
9
10
11
12
13
pi@raspberrypi:~/Program/WiringPi $ gpio -v
gpio version: 2.61
Copyright (c) 2012-2018 Gordon Henderson
This is free software with ABSOLUTELY NO WARRANTY.
For details type: gpio -warranty

Raspberry Pi Details:
Type: Pi 3, Revision: 02, Memory: 1024MB, Maker: Embest

Device tree is enabled.
*--> Raspberry Pi 3 Model B Rev 1.2

This Raspberry Pi supports user-level GPIO access.

查看GPIO状态

1
2
3
4
5
6
7
8
9
10
11
12
13
14
15
16
17
18
19
20
21
22
23
24
25
26
27
pi@raspberrypi:~/Program/WiringPi $ gpio readall
+-----+-----+---------+------+---+---Pi 3B--+---+------+---------+-----+-----+
| BCM | wPi | Name | Mode | V | Physical | V | Mode | Name | wPi | BCM |
+-----+-----+---------+------+---+----++----+---+------+---------+-----+-----+
| | | 3.3v | | | 1 || 2 | | | 5v | | |
| 2 | 8 | SDA.1 | IN | 1 | 3 || 4 | | | 5v | | |
| 3 | 9 | SCL.1 | IN | 1 | 5 || 6 | | | 0v | | |
| 4 | 7 | GPIO. 7 | IN | 1 | 7 || 8 | 0 | IN | TxD | 15 | 14 |
| | | 0v | | | 9 || 10 | 1 | IN | RxD | 16 | 15 |
| 17 | 0 | GPIO. 0 | IN | 0 | 11 || 12 | 0 | IN | GPIO. 1 | 1 | 18 |
| 27 | 2 | GPIO. 2 | IN | 0 | 13 || 14 | | | 0v | | |
| 22 | 3 | GPIO. 3 | IN | 0 | 15 || 16 | 0 | IN | GPIO. 4 | 4 | 23 |
| | | 3.3v | | | 17 || 18 | 0 | IN | GPIO. 5 | 5 | 24 |
| 10 | 12 | MOSI | IN | 0 | 19 || 20 | | | 0v | | |
| 9 | 13 | MISO | IN | 0 | 21 || 22 | 0 | IN | GPIO. 6 | 6 | 25 |
| 11 | 14 | SCLK | IN | 0 | 23 || 24 | 1 | IN | CE0 | 10 | 8 |
| | | 0v | | | 25 || 26 | 1 | IN | CE1 | 11 | 7 |
| 0 | 30 | SDA.0 | IN | 1 | 27 || 28 | 1 | IN | SCL.0 | 31 | 1 |
| 5 | 21 | GPIO.21 | IN | 1 | 29 || 30 | | | 0v | | |
| 6 | 22 | GPIO.22 | IN | 1 | 31 || 32 | 0 | IN | GPIO.26 | 26 | 12 |
| 13 | 23 | GPIO.23 | IN | 0 | 33 || 34 | | | 0v | | |
| 19 | 24 | GPIO.24 | IN | 0 | 35 || 36 | 0 | IN | GPIO.27 | 27 | 16 |
| 26 | 25 | GPIO.25 | OUT | 0 | 37 || 38 | 0 | IN | GPIO.28 | 28 | 20 |
| | | 0v | | | 39 || 40 | 0 | IN | GPIO.29 | 29 | 21 |
+-----+-----+---------+------+---+----++----+---+------+---------+-----+-----+
| BCM | wPi | Name | Mode | V | Physical | V | Mode | Name | wPi | BCM |
+-----+-----+---------+------+---+---Pi 3B--+---+------+---------+-----+-----+

方法2

WiringPi 已经预装在 Raspbian 标准版及完整版系统中,可以直接移步到后面进行gpio调试,Raspberry Pi OS lite比较精简,需要单独配置安装。

检查是否安装

首先我们通过查看gpio版本命令来检查wiringPi是否安装。

在终端中,键入以下命令:

1
gpio -v
显示 command not found 说明并未安装
1
2
pi@Rpi4B2G:~ $ gpio -v
-bash: gpio: command not found

image-20221207110326104

Apt 安装

在 Raspbian-Lite (精简版)系统中键入以下命令进行安装:

1
2
sudo apt update
sudo apt-get install wiringpi

如果官方库中没有的话会提示安装失败,我们接下来尝试下面的安装方法

下载安装

官方提供了最新版wiringpi的deb包下载(支持树莓派4B),我们可以通过wget命令下载和dpkg命令进行安装。

1
2
wget https://project-downloads.drogon.net/wiringpi-latest.deb
sudo dpkg -i wiringpi-latest.deb
再次检查wiringPi是否安装成功
1
gpio -v
结果显示如下信息,wiringPi成功安装,版本号2.52。
1
2
3
4
5
6
7
8
9
10
11
12
13
14
pi@Rpi4B2G:~ $ gpio -v

gpio version: 2.52
Copyright (c) 2012-2018 Gordon Henderson
This is free software with ABSOLUTELY NO WARRANTY.
For details type: gpio -warranty

Raspberry Pi Details:
Type: Pi 4B, Revision: 01, Memory: 2048MB, Maker: Sony

Device tree is enabled.
*--> Raspberry Pi 4 Model B Rev 1.1

This Raspberry Pi supports user-level GPIO access.

输入下面的命令,它会读取所有可访问的引脚并打印它们的引脚编号表(wiringPi 和 BCM_GPIO,对应图表),以及它们的模式和数值。

1
gpio readall

不是很清晰?别急,下面附上我整理的 GPIO引脚对应表,希望对大家学习树莓派有所帮助。

github

Github上能找到的是非官方镜像分支,主要是对Node、Perl、PHP、Python、Ruby等语言进行了包装

1
2
3
4
5
6
https://github.com/WiringPi/WiringPi
Node - https://github.com/WiringPi/WiringPi-Node
Perl - https://github.com/WiringPi/WiringPi-Perl
PHP - https://github.com/WiringPi/WiringPi-PHP
Python - https://github.com/WiringPi/WiringPi-Python
Ruby - https://github.com/WiringPi/WiringPi-Ruby
GPIO 应用帮助

查看GPIO帮助的命令

1
man gpio

方法2

Python

使用VNC远程桌面

第一步 配置树莓派
树莓派命令行中,输入

1
2
sudo raspi-config
这会打开一个图形化界面。界面中使用方向键控制光标,Enter键进行选择。

需要说明的是,如果下面的说明中,你的树莓派没有对应选项,那可能因为版本原因,选项在不同的入口。否则的话请忽略。配置步骤:

打开VNC:Interfacing Options -> VNC -> Yes
退出图形化界面:(左右方向键选择)Finish
这时,无需重启即可使用vnc服务

第二步 配置远程操控的电脑
在官网下载VNC Viewer。

安装完成后,打开应用,在最上方输入树莓派的局域网ip地址。

顺利的话,会出现一个权限请求,允许后即可预览(个人经验是初次使用时很卡,但在完成初次装机配置流程中的软件更新步骤并重启后就非常的流畅了)。

错误处理:VNC Viewer黑屏,提示当前暂时无法预览桌面
扩展树莓派的文件系统似乎会导致已经打开的VNC功能再次关闭。

解决办法是在树莓派中再次打开VNC

1
sudo raspi-config

选择Interfacing Options -> VNC -> Yes,然后用左右方向键选择Finish即可。

第三步(可选):(局域网外)远程访问
点我进入传送门

参考链接
Remote development on the Raspberry Pi (or Amazon EC2)

错误

错误

内容1
1
2
ntend - open (13: Permission denied)
E: Unable to acquire the dpkg frontend lock (/var/

解决

1
sudo apt-get --fix-broken install
内容2
1
You are about to do something potentially harmful.  To continue type in the phrase 'Yes, do as I say!'  ?]

输入

1
Yes, do as I say!
内容3

在执行sudo apt-get upgrade命令之后有时候会提示

1
The following packages were automatically installed and are no longer required.

也就是按照字面意思之后的包已经不被需要了,这个时候就可以把这些包清除掉从从而来节约空间

清除这些包的代码如下

1
sudo apt-get autoremove

然后输入‘y’即可清除

编程

基础

点灯

1
2
3
4
5
6
7
8
9
10
11
12
13
14
15
16
17
import RPi.GPIO as GPIO
import time

PIN = 16

GPIO.setmode(GPIO.BOARD)
GPIO.setup(PIN, GPIO.OUT)
GPIO.output(PIN, GPIO.HIGH)

for num in range(0, 10):
print ("gpio out :", num)
GPIO.output(PIN, num%2)
time.sleep(1)


GPIO.cleanup()
print("gpio out end\r\n")

按键

1
2
3
4
5
6
7
8
9
10
11
12
13
14
15
16
17
18
19
20
21
22
23
24
#-*-coding:utf-8-*-       //支持中文注释
import RPi.GPIO as GPIO #导入RPi模块
import time #使用延时功能
KEY = 16 #BCM第18引脚
LED = 18

GPIO.setmode(GPIO.BOARD) #设置BCM编码

GPIO.setup(KEY,GPIO.IN,GPIO.PUD_UP)#设置输入,上拉
GPIO.setup(LED, GPIO.OUT)

while 1:
time.sleep(0.05)
if(GPIO.input(KEY)==1) : #判断是否按下
if( GPIO.input(LED)==0): #判断电平
i = 1
else :
i = 0

GPIO.output(LED,i)
print("key press",i)

while (GPIO.input(KEY)):
i = ~i